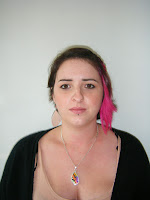
The initial part to the 3D face was to prep the reference images taken, for use in 3D max. To do this I used Photoshop. The image result that I wanted to create was a flat representation of my face; I could achieve this by using the lens correction option in photoshop. My right pupil was higher than the left, to correct this I used the straighten tool and focused it on the centre of my pupils. I was already aware that I tilt my head to the side naturally which helped when looking for these issues to correct. I then went on to remove any distortion which occurred when taking the photograph as barrel distortion from the lens is common. I also adjusted the vertical perception to tilt the plane. I then went on to do the same to my left profile. To check that the key features lined up I merged both images and extended the canvas to the right so that I was able to view both. I then changed the opacity on the left reference so that I could still see both. I used the rulers in photoshop to check that the main features such as the eyes, nose and mouth were aligned. I then saved the image as a jpg ready to add my topology.
Side and Front Profile Pictures


No comments:
Post a Comment