I will now go on to use primitives to improve the geometry of my model. I went back into Photoshop to add more topology to the left view reference; I used the same method as before and used distinctive wrinkles etc, to define where my topology should sit. As a lot of my hair was covering this I found it very difficult and had to assume where the lines would be. I then went back into 3D Max and updated my reference planes. Once completed I began to model again, starting with creating a sphere to use as the top of my head. I moved the sphere over my head and placed it where I felt it lined up best. I then went on to orientate the poles of the sphere by using the rotate option so that they were showing at the side. Once this was done I was able to line up the edges with those of my head, decreasing the segments to match, this would allow the welding of those edges to be completed far quicker.


The next stage was to get rid of the extra geometry. This was achieved by turning on the marquee paint selection. I painted across all of the interior quads to the side keeping a strip down the back of the head. I then did the same with the right hand side of the sphere as my model would mirror any changes. I then lined the quads up using the move tool and soft selection, snaps toggle was turned on so that the vertices were close together. To carry on the neck through and across the shoulder I held down shift and moved the edges out creating new quads. It was at this point that I realised I had no reference for my ear I therefore carried on the faces and covered where the ear would be. Unfortunately there was not enough time to complete an ear.

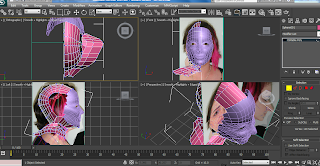
To simplify the geometry of the sphere I selected every other edge to the left side of the sphere, I then selected ring and then collapse within edit geometry giving a simpler form which will be easier to modify. To finish I went on to target weld the vertices of the head and sphere.

No comments:
Post a Comment